Quantcast
Channel: Veeam Support Knowledge Base
Viewing all 4470 articles
Browse latest View live

Using alert description, time generated and other data in a scripted action

$
0
0

Challenge

The article gives an example of how alarm data can be used in scripting actions.

Cause

You would like to use alarm data in custom scripts.

Solution

Run script — select this option if you want to run a custom script when the alarm is triggered or when the alarm status changes. By running a post-alarm script, you can automate routine tasks that are normally performed when specific alarms fire. For example, if a critical system is affected, you may need to immediately open a ticket with the in-house support or perform some corrective actions that will eliminate the problem.

In the Value field, enter the path to the executable file (please note that the executable file must be located on the Veeam ONE server). You can use the following parameters in the command line for running the script: %1 — alarm name; %2 — fired node name; %3 — triggering summary; %4 — time; %5 — alarm status; %6 — old alarm status.

User-added image


Example:

REM A script to log alarms in a text file C:\temp\alarm.txt
SET v1=%1
SET v2=%2
SET v3=%3
SET v4=%4
SET v5=%5
SET v6=%6


echo %v1%>>C:\temp\alarm.txt
echo %v2%>>C:\temp\alarm.txt
echo %v3%>>C:\temp\alarm.txt
echo %v4%>>C:\temp\alarm.txt
echo %v5%>>C:\temp\alarm.txt
echo %v6%>>C:\temp\alarm.txt

echo ================================>>C:\temp\alarm.txt

How to enable advanced space control for Scale-out Backup Repository

$
0
0

Challenge

Jobs running to Scale-Out Repository report "No scale-out repository extents have sufficient disk space to store the backup file", while at least some of the extents have a lot of free space.

Cause

Veeam Backup Service stores information about free space on each extent in cache. When Scale-out Backup Repository  resource is assigned to a certain task, number in cache is subtracted with estimated  size of task and is not updated with real free space while there is at least one task going to extent. Estimates may be not precise and difference between real and cached free space may grow.

Solution

Update 2 for Veeam Backup & Replication introduces new space update logic. When extent is assigned to a new task, service cache updates free space information with the real one and subtracts it with estimated sizes of all the tasks currently going to this extent.

You can switch to new logic by creating the following registry key:

Key: HKLM\SOFTWARE\Veeam\Veeam Backup and Replication\SobrForceExtentSpaceUpdate
Type: DWORD
Default Value: 0 (Disabled)

and setting value to 1 (Enabled).

Deploying Network Hub in On-Premises Network

$
0
0

Challenge

This article contains instructions for deploying the network hub in an on-premises network.

Cause

If you want to place the network hub in an on-premises network, you must deploy a Veeam PN appliance in the VMware vSphere environment. The Veeam PN appliance is distributed as an OVA package. The package contains a pre-configured 64-bit Linux virtual appliance on which Veeam PN components are set up.
 

Solution

To deploy and set up the network hub, you will need to perform the following steps:
1. Deploy a Veeam PN appliance from the OVA package.
2. Configure initial network hub settings.


Deploying Veeam PN Appliance

To deploy the network hub from the OVA package:

1. Download the Veeam PN OVA package here and save it in a network shared folder.

2. In VMware vSphere Web Client, open the hosts and clusters inventory list and select a host on which you want to register the appliance.

3. From the menu at the top of the working area, select Actions > Deploy OVF Template.

4. At the Select source step of the wizard, select Local file, click Browse and browse to the Veeam PN OVA package.

User-added image

5. Follow the next steps of the wizard and specify appliance deployment settings: datastore on which the appliance disk must be placed, disk format, network to which the appliance must be connected and so on.

6. At the last step of the wizard, select the Power on after deployment check box and click Finish.

User-added image

VMware vSphere will deploy the Veeam PN appliance on the selected host. The deployment process typically takes several minutes. Wait for this process to complete and proceed to the network hub configuration.


Configuring Initial Network Hub Settings

Right after deployment, the Veeam PN virtual appliance is impersonalized. To set up the network hub, you must customize the appliance — configure the network hub settings on it.

To configure initial settings for the network hub:

1. In VMware vSphere Web Client, navigate to the Summary tab and get an IP address of the appliance.

2. In a web browser, access the network hub portal by the following address: https://<applianceIP>, where <applianceIP> is the IP address of the deployed appliance.
When you access the network hub portal in the web browser, the browser will display a warning notifying that the connection is untrusted. Ignore the warning and agree to proceed to the portal.

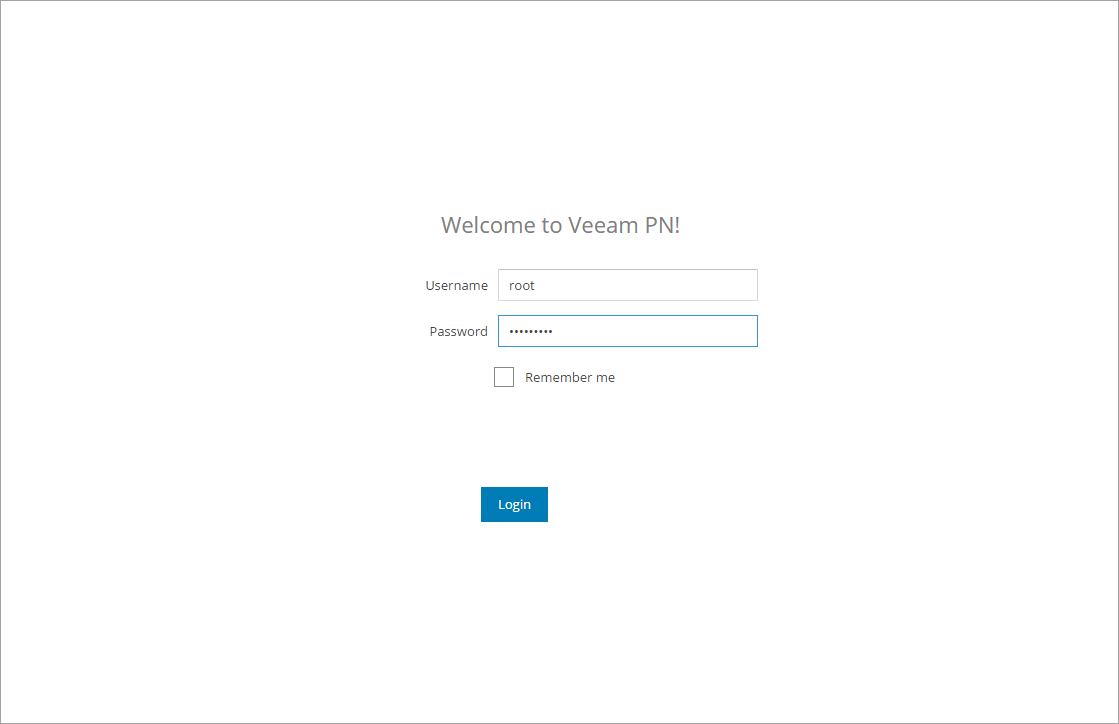
3. At the Welcome to Veeam PN screen of the portal, log in to the network hub portal under the in-built Administrator account. The Administrator account has the following credentials:
Username: root
Password: VeeamPN
Click Login.

User-added image

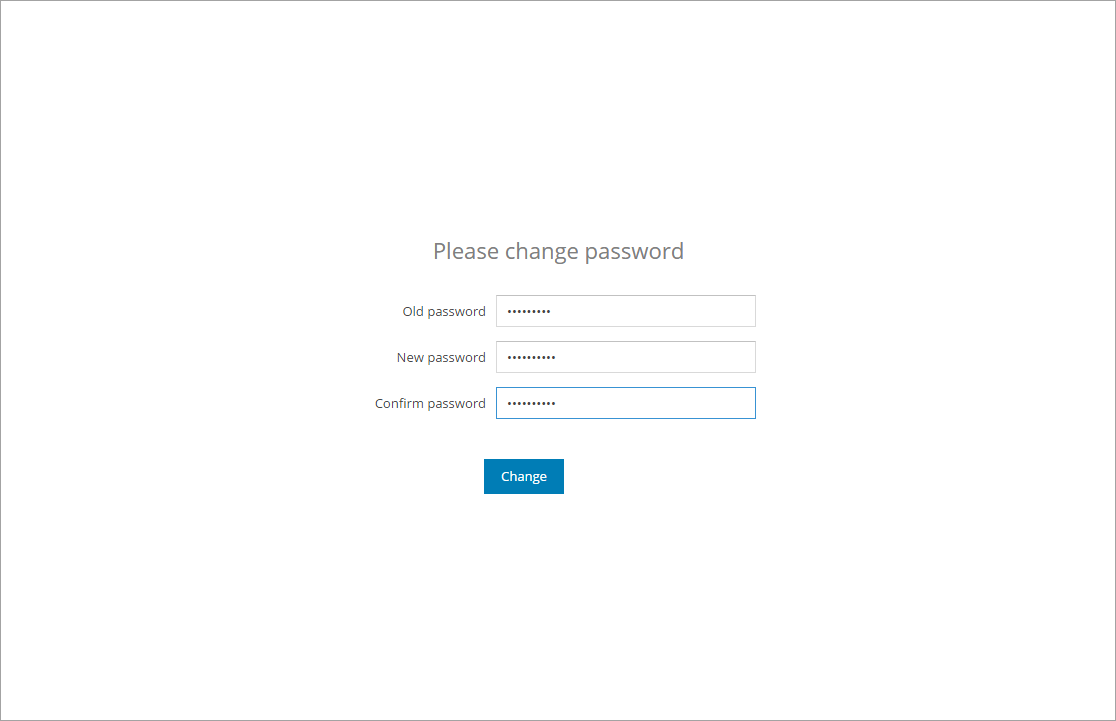
4. After you log in to the portal for the first time, Veeam PN will offer you to change the password for the built-in account. On the displayed screen, enter the old and new password and click Change.

User-added image

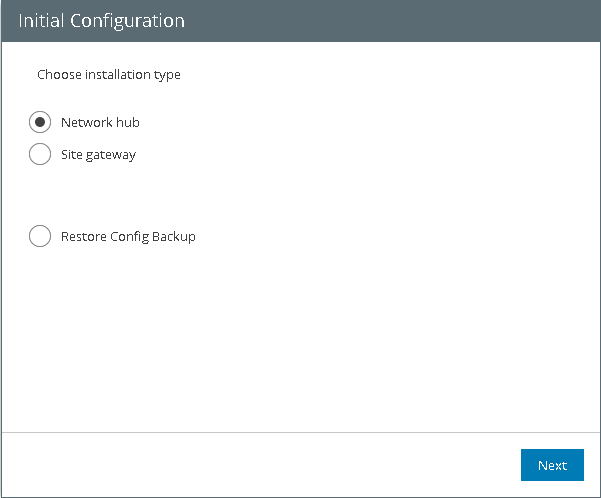
5. At the first step of the Initial Configuration wizard, select Network hub.

6. Click Next.

User-added image

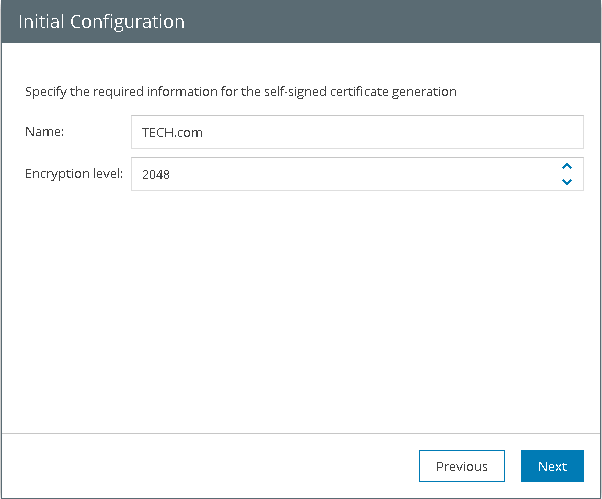
7. Veeam PN uses a self-signed SSL certificate to ensure secure data communication in the VPN. Specify parameters for the self-signed certificate: your company details, certificate lifetime (validity) and certificate key length (dhBits).

8. Click Next.

Note: By default, Veeam PN generates a 2048-bit certificate. If you select a key of a greater size, the process of certificate generation may take a long time.

User-added image

9. Veeam PN will generate a self-signed SSL certificate with the specified parameters. After the certificate is generated, click OK, then click Next to proceed to the network hub setup.

User-added image

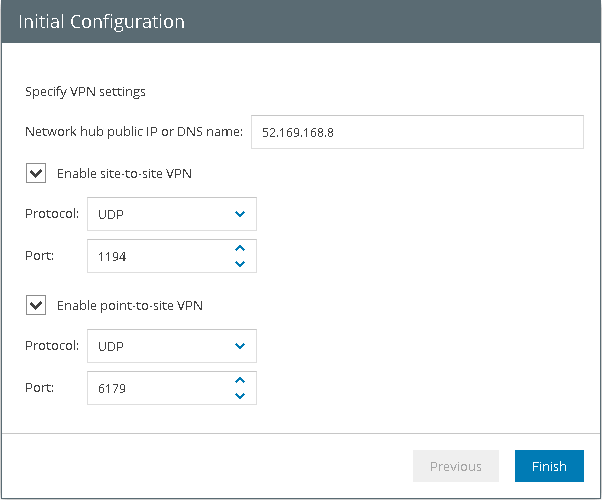
10. Specify VPN settings for the network hub:
 

  • In the Network hub public IP or DNS name field, specify an IP address or full DNS name for the network hub. The IP address or DNS name must be public and accessible from all networks that you add to the VPN, and by all remote users who must have access to the VPN.
  • Select the Enable site-to-site VPN check box if you want to implement the site-to-site VPN scenario. In the Protocol field, specify the protocol that must be used for communication between VPN components: UDP or TCP. In the Port field, specify a port on which the network hub must listen for site gateway connections. By default, port 1194 is used.
  • Select the Enable point-to-site VPN check box if you want to implement the point-to-site VPN scenario. In the Protocol field, specify the protocol that must be used for communication between VPN components: UDP or TCP. In the Port field, specify a port on which the network hub must listen for standalone computer connections. By default, port 6179 is used.
Note: It is recommended that you use the UDP protocol. While TCP guarantees delivery of data packets, UDP ensures faster data transmission since it does not require any data flow control.

User-added image

11. Click Finish.


What You Do Next

After you configure the network hub, you must perform the following steps:
  • You must log in to the network hub portal and configure settings for clients — on-premises networks (site-to-site scenario) and standalone computers (point-to-site scenario).
  • If necessary, you can change the network hub settings, for example, configure alerts, enable SSH access to the network hub appliance and so on.

More Information

Download the Veeam PN OVA package here.

Your backup target does not support this product version and needs to be upgraded

$
0
0

Challenge

During an upgrade from Veeam Endpoint Backup Free to Veeam Agent for Microsoft Windows 2.0, you receive the following warning:

Your backup target does not support this product version and needs to be upgraded
User-added image

Cause

If Veeam Agent for Microsoft Windows is to be integrated with Veeam Backup & Replication, version 9.5 Update 2 of the latter is required.

During the upgrade, Veeam Agent for Microsoft Windows checks the latest backup made by Veeam Endpoint Backup Free and gets the information about Veeam Backup & Replication version.

However, Veeam Endpoint Backup Free is not aware of the updated Veeam Backup & Replication server unless a backup job has been run after the upgrade to 9.5 U2.

Solution

Either
disregard the warning message

or
run a backup with Veeam Endpoint Backup Free 1.5 to Veeam Backup & Replication before upgrading to Veeam Agent for Microsoft Windows 2.0.
 

Release Notes for Veeam Management Pack 8.0 Update 4

$
0
0

Challenge

Release Notes for Veeam Management Pack 8.0 Update 4.

Cause

Please confirm you are running Veeam Management Pack 8.0 prior to installing this update. You can check this in Operations Manager console under Administration | Management Packs, the build number should be 8.0.0.2218 or later.

To install the update, import the management packs through Operations Manager console > Administration > Management Packs > Import Management Packs.

To obtain Veeam MP 8.0 for System Center - Update 4, please download it here.

Solution

New features:

- Veeam Integration Pack for Operations Management Suite
- Veeam VMware custom vCenter Alarm Monitor now supports VMs as target
- Improved Veeam Hyper-V Host CPU Scheduling Analysis monitor
- Datastore Unknown Files Analysis monitor supports Num Samples parameter
- Additional drill-down link in Veeam MP Analysis Reports

Resolved issues:

- Web console displays a blank page instead of Morning Coffee Dashboard
- ‘VMwareCluster.totalvMotions’ performance metric values not collected
- Hyper-V Cluster Disk counters display incorrect values
- False alerts from ‘Veeam Hyper-V VM Checkpoint Age’ monitor
- Empty Guest OS and Guest DNS name properties
- High memory usage causes Health Service restarts
- ‘Veeam Backup: Repository Connection Status’ availability monitor works as expected

More Information

To obtain Veeam MP 8.0 for System Center - Update 4, please download it here.

Release Notes for Veeam Agent for Linux Update 1

$
0
0

Challenge

Release Notes for Veeam Agent for Linux Update 1
 

Cause

Please confirm you are running Veeam Agent for Linux 1.0.0.944 or later.
If so, run one of the following commands to update Veeam packages:

For CentOS / RHEL / Oracle Linux / Fedora:
yum update veeam

For openSUSE / SLES:
zypper up veeam

For Debian / Ubuntu:
apt-get install --only-upgrade veeam

This will make your packet manager upgrade Veeam Agent for Linux and its backend database automatically. After upgrading, your version build will be 1.0.1.364

If you don’t have Veeam Agent for Linux installed, please follow the instruction in the User Guide.
Before you apply the update, make sure you have a configuration dump of your settings.


Solution

As a result of on-going R&D effort and in response to customer feedback, Update 1 includes over 100 enhancements and bug fixes, the most significant of which are listed below.

Integration with Veeam Backup & Replication

Exagrid support*, specify an existing Exagrid Veeam repository as a target for your Linux backups.

File system indexing support**, including search for OS files inside backups and 1-click restore in Veeam Backup Enterprise Manager.


Veeam Recovery Media

Custom Recovery Media support, adds ability to create custom recovery media which includes storage and network drivers that are currently installed on your machine.


User interface

Wizard improvements. We've placed all advanced settings such as scripts and file system indexing in one step to make it easier to navigate.


This update also resolves the following common support issues:
-    Addressed an issue with file-level backup for files with names encoded in ISO 8859-1 and containing symbols with encoding not matching ASCII encoding (such as ß, ü, ä, ö).
-    Addressed an issue with missing info about agent backup job start time in Veeam Backup & Replication console.
-    Automatic restore of logical volumes***
-    Fixed an issue with bare-metal restores to HP Smart Array.
-    Fixed numerous issues with backup of RAID and multipath devices.
-    Addressed an issue with snapshot placement atop of an encrypted device.
-    Addressed user interface slowness in case when many backup sessions are displayed on the screen.
-    Inactive logical volumes are automatically skipped from the entire machine backup instead of failing the job.
-    Addressed an issue with backing up disks that have /dev/xv* name format.

* Requires Veeam Backup & Replication 9.5 U2 or later
** Requires Veeam Backup & Replication 9.5 U2 or later, file masks are not inherited by indexing mechanism, indexing operation may fail on CentOS/RHEL versions 6/7 if SELinux is set to “Enforcing” mode
*** Thinly-provisioned logical volumes restores require manual VG creation


More Information

Download Veeam Agent for Linux Update 1 here

One or more bad blocks were detected and skipped

$
0
0

Challenge

When you back up a drive contaning bad blocks, then perform a bare-metal restore to a new drive and run a backup job, it will return this warning:
 
One or more bad blocks were detected and skipped

Cause

Windows stores information about bad blocks in a $BadClus metadata file. After performing a bare metal restore, $BadClus is not updated, so Windows still considers some blocks invalid.

Solution

Run chkdsk /b volume_letter to refresh the information about bad blocks.

Importing Veeam ONE Monitor alarms

$
0
0

Challenge

You need to import all alarms with their default values into Veeam ONE Monitor.

Solution

  1. Obtain the full list of alarms for version 9.0 here or for version 9.5 here
  2. Open Veeam ONE Monitor and navigate to the Alarm Management node.
  3. Right-click on the container you wish to import the alarms for in the left pane and select Import Alarms.

More Information

If you have any questions, contact Veeam Support.

License Auto-Update Does Not Function with Mixed Contract VM Types

$
0
0

Challenge

When you attempt to auto-renew a rental license in Veeam Backup & Replication under the License tab with a contract where both VMware and Hyper-V hypervisors exists it results in the following error message:

"Licensing counters are invalid"

Cause

At this time the auto renew function works only for license keys with VM counts for either VMware or Hyper-V server protected VMs. Attempts to auto-renew a license file containing both VMware and Hyper-V VM counts results in the error message: "Licensing counters are invalid"

Solution

This is currently expected behavior. Continune to manually update mixed license rental files as has been performed since prior to v9.5 Update 2.Instructions can be found here: https://helpcenter.veeam.com/docs/backup/vsphere/install_license.html?ver=95

How to use Windows Management Instrumentation (WMI) Tester [WBEMTest] to troubleshoot WMI

$
0
0

Challenge

This knowledge base article was created to document how to use Windows Management Instrumentation (WMI) Tester [WBEMTest] to assist in the troubleshooting and isolating of WMI call related issues with Veeam Backup & Replication.

Solution

To open Windows Management Instrumentation (WMI) Tester
From a run prompt execute the command ‘wbemtest’.
(If you are testing RPC or a WMI call (and not WMI in general) then open wbemtest on the computer with Veeam software installed on it.)
 
Connecting to a network node and namespace
To connect to a network node click on “Connect…” in the upper right corner of the application. This will open a new window where you can enter connection parameters. 

User-added image

Specify the namespace to connect to in the namespace section.
 
If you are testing WMI with the local server you will enter the namespace.

User-added image

If testing WMI with a remote server you will enter that server’s hostname prior to the name space in the same way you would a UNC path.

When connecting to a remote server you must specify the credentials for the connection.
 
For example, to connect to the ‘root/cimv2’ on a server named ‘host1’:
     \\host1\root\cimv2 

User-added image

Once you have entered in the correct path and credentials (if applicable), click the “Connect” button. This will close the Connect window. You will see the path listed under “Namespace:” if you connected successfully.
 
If there is a connection issue a pop-up with error details will appear.
 
After a connection has been successfully created, a query can be tested by clicking the “Query” button. 

User-added image

This will open a new window labeled “Query”.
 
Enter a WMI query, then click apply. After clicking apply the Query window will close and show a Query Result window.
 
For example, the following query works when connect to the cimv2 namespace:
     select * from Win32_OperatingSystem

User-added image


The example result is shown below.

User-added image


Difference Between Typical and Advanced Scalability Modes

$
0
0

Challenge

Understanding the difference between Typical and Advanced scalability modes.

Cause

Depending on the size of the managed virtual environment, you can choose of the following Veeam ONE installation types:
  • Typical — this type of installation is recommended for small to medium environments, with up to 100 hosts and 1500 VMs
  • Advanced Scalability — this type of installation is recommended for large environments with more than 100 hosts and 1500 VMs
Installation type is defined by a set of configuration parameters that determine Veeam ONE behavior in a number of areas, such as data collection and other. Choosing the appropriate installation type allows you to optimize monitoring and reporting performance and improve user experience in Veeam ONE.

Solution

To switch between the modes, on Veeam One server run "C:\Program Files\Common Files\Veeam\Veeam ONE Settings\VeeamOneSettings.exe" > Deployment Configuration > Save > Restart Veeam One Monitor and Veeam One Reporter services.

NOTE that the previously collected data will not be revisited.

User-added image
 

More Information

Changing between scalability modes affects the following settings
 
Configuration OptionDescriptionTypical InstallationAdvanced Scalability
VMware real-time performance query timeoutTimeout for collecting VMware vSphere real-time performance data.300 seconds
(5 minutes)
1200 seconds
(20 minutes)
Sampling renewal interval for real-time counters.20 seconds300 seconds
(5 minutes)
VMware historical performance query timeoutTimeout for importing historical performance data from VMware vSphere servers (that is, data older than one day).900 seconds
(15 minutes)
1800 seconds
(30 minutes)
Sampling renewal interval for historical counters.300 seconds
(5 minutes)
1200 seconds
(20 minutes)
MinTreeCheckIntervalUpdating Tree in Veeam ONE Monitor every10 seconds1 minute
PageUpdateDelayLoading data after choosing an object in the Tree in0.5 second1.5 second
GetVmsnapshottimeoutTimeout for collecting data about VM snapshot files from datastores.900 seconds
(15 minutes)
3600 seconds
(1 hour)
CollectthreadtimeoutTimeout for collecting data from servers by Veeam ONE Reporter.6 hours12 hours
DahboardCapturetimeoutTimeout for capturing the dashboard for a scheduled dashboard delivery.3600 seconds
(1 hour)
7200 seconds
(2 hours)
Hyper-V cache retention settingsTime period to keep Hyper-V inventory data in cache.-1
(infinite period of time)
120 seconds
(2 minutes)
Hyper-V collection job intervalFrequency with which data is collected from Microsoft Hyper-V servers.60000 milliseconds
(1 minute)
120000 milliseconds
(2 minutes)
Ignore disconnected Hyper-V hostsFlag indicating that data on disconnected hosts must not be retained.FalseTrue

For new modes implemented with version 9.5, refer to this KB article.

A full backup is created when the RDX cartridge is changed

$
0
0

Challenge

When an RDX storage is used as a repository in Veeam Backup & Replication, and a backup job from Veeam Agent for Microsoft Windows is targeted at it, a new backup chain will start each time the RDX cartridge is changed.

Cause

The behavior is by design. More information is available in the User Guide.

Solution

If the RDX storage is presented to Veeam Agent for Microsoft Windows directly (not as a Veeam Backup & Replication repository), each cartridge will contain its own backup chain.

When a cartridge is injected for the first time, a new chain will start. When a cartridge with an existing chain is injected, the chain stored on this specific cartridge will resume.

HCL - Huawei OceanStor Dorado V3

$
0
0

Challenge

Product Information

Product Family: Huawei OceanStor 
Status:  Veeam Ready – Repository 
Classification Description: Verified backup storage that supports all Veeam backup and restore features. 

Solution

Product Details

Model number: Huawei OceanStor Dorado V3 All-Flash Storage System 
Number of Drives: 12 
Drive type: 400 GB SSD 
Firmware version: V3 
General product family overview: Purpose built for mission-critical services, the OceanStor Dorado V3 all-flash storage system provides high-performance, high-reliability, and high-efficiency storage services. 

The proprietary FlashLink technology ensures 4 million IOPS at 500 μs consistent latency. The HyperMetro gateway-free active-active design delivers 99.9999% availability with only 1 ms latency. Industry-leading inline de-duplication and compression technologies help reduce your initial purchase cost. 

The offering fully satisfies the storage requirements of databases, virtual desktops, virtual servers, and other applications, smoothing the way for customers in finance, manufacturing, government, telecom, and a host of other sectors in their move to the all flash era. 


Veeam Details

Veeam Build Number: 9.5 
Veeam Settings:  

  • Repository Type: Windows 
  • Deduplication: Yes 
  • Compression: Optimal 
  • Storage Optimization: Local target  
  • Per-VM Backup Files: Yes 
  • Decompress before storing: Yes  
  • Align backup file blocks: Yes 

More Information

Company Information

Company name: Huawei Technologies Co., Ltd. 
Company overviewhttp://www.huawei.com/en/ 

A full backup is created when the RDX cartridge is changed

$
0
0

Challenge

When an RDX storage is used as a repository in Veeam Backup & Replication, and a backup job from Veeam Agent for Microsoft Windows is targeted at it, a new backup chain will start each time the RDX cartridge is changed.

Cause

The behavior is by design. More information is available in the User Guide.

Solution

If the RDX storage is presented to Veeam Agent for Microsoft Windows directly (not as a Veeam Backup & Replication repository), each cartridge will contain its own backup chain.

When a cartridge is injected for the first time, a new chain will start. When a cartridge with an existing chain is injected, the chain stored on this specific cartridge will resume.

Creating a VMware ESXi extension (VIB) for Veeam Backup from Storage Snapshot with Cisco HyperFlex IOvisor processing

$
0
0

Challenge

This article contains instructions on how to create a VMware ESXi extension (VIB) for Veeams Backup from Storage Snapshot with Cisco HyperFlex IOvisor processing.

To achieve the optimal balancing within the Cisco HyperFlex data network at Backup from Storage Snapshot processing over NFS, it is needed to change the ESXi host firewalls. See more background information here.

One of the Methods to change the ESXi host firewall is by a newly created VIB file that can be created with help of the VMware VIB Author Software.
Please follow the next steps to create the VIB.

Solution

Create a VIB in SLES11

SLES11 can be downloaded here.
VMware VIB Author can be downloaded here.
All steps are performed as the root user from the root (/) directory.

1. Prepare SLES
zypper install python-lxml
zypper install python-urlgrabber

2. Install VIB Author
cd /tmp
rpm -ivh vmware-esx-vib-author-5.0.0-0.0.847598.i386.rpm
cd /

 3. Create File Directory
mkdir stage
mkdir stage/payloads
mkdir stage/payloads/payload1
mkdir stage/payloads/payload1/etc
mkdir stage/payloads/payload1/etc/vmware
mkdir stage/payloads/payload1/etc/vmware/firewall

4. Copy the required files to the folder tree
The "descriptor.xml" (link here) must be copied to /stage

descriptor.xml sample:
<vib version="5.0">
 
<type>bootbank</type>
<name>VeeamCiscoHXFirewall</name>
<version>1.0.0-0.0.1</version>
 
 <vendor>Veeam</vendor>
 <summary>Veeam Firewall rule for Cisco HyperFlex</summary>
 <description>Adds inbound ports required by Veeam</description>
 
 <relationships>
  <depends></depends>
  <conflicts/>
  <replaces/>
  <provides/>
  <compatibleWith/>
 </relationships>
 <software-tags>
 </software-tags>
 <system-requires>
  <maintenance-mode>false</maintenance-mode>
 </system-requires>
 <file-list>
  <file></file>
 </file-list>
 <acceptance-level>community</acceptance-level>
 <live-install-allowed>true</live-install-allowed>
 <live-remove-allowed>true</live-remove-allowed>
 <cimom-restart>false</cimom-restart>
 <stateless-ready>true</stateless-ready>
 <overlay>false</overlay>
 <payloads>
  <payload name="payload1" type="vgz"></payload>
 </payloads>
 
</vib>

The “VeeamCiscoHXFirewall.xml” <download link> must be copied to /stage/payloads/payload1/etc/vmware/firewall

VeeamCiscoHXFirewall.xml example:
<ConfigRoot>
  <service id='1230'>
    <id>VeeamCiscoHXFirewall</id>
    <rule id='0000'>
      <direction>inbound</direction>
      <protocol>tcp</protocol>
      <porttype>dst</porttype>
      <port>
        <begin>0</begin>
        <end>65535</end>
      </port>
    </rule>
    <enabled>true</enabled>
    <required>false</required>           
  </service>
</ConfigRoot> 

5. Create the VIB using vibauthor:
vibauthor -C -t stage -v VeeamCiscoHXFirewall -f

6. Creation finished, ready for download
The VIB is now created and available in the root (/) directory. You can use the SCP client to download the VIB to your local operating system.

7. Install on ESXi

Install the Firewall VIB on ESXi:

Repeat the following steps on all Cisco HyperFlex nodes in your cluster.

a. Enable ssh and log in to your ESXi host using a ssh tool like PuTTY
User-added image

b. Copy the VIB file to the ESXi host's tmp folder using HTTP or a SCP client
User-added image

c. Install the VIB
Command:
esxcli software vib install -v /tmp/VeeamCiscoHXFirewall.vib -f

User-added image

d. Verify that the VIB was installed
Command:

esxcli software vib list | grep 'Veeam'
User-added image

e. Verify that the new firewall rule is active
Command:
esxcli network firewall ruleset list
User-added image

Note: If the VIB installation fails, you may need to set the acceptance level to CommunitySupport and retry the installation.
Command:
esxcli software acceptance set --level=CommunitySupported

 Set the Veeam Proxy Servers

1. Enable allowed IP list for the new firewall rule
Command:
esxcli network firewall ruleset set -r "VeeamCiscoHXFirewall" -a false
User-added image

2. Set the Veeam proxy server data network IP (storage network)
Repeat the following command for all Veeam proxy server or set a subnet.
Command:
esxcli network firewall ruleset allowedip add -r "VeeamCiscoHXFirewall" -i "172.16.3.10"
User-added image

3. Verify that the IPs are set
Command:
esxcli network firewall ruleset allowedip list | grep -v "All"
User-added image


Note: Veeam recommends to set all IPs of Veeam proxy servers in the firewall rule. Otherwise the firewall rule is enabled for all incoming connections. You can specify either the IP address or a subnet. Use one command per proxy.


Check if everything is configured correctly

1. Check the Security Profile on the ESXi hosts
User-added image

2. Check the VIB
esxcli software vib list | grep 'Veeam'
User-added image

3. Check the ruleset
esxcli network firewall ruleset list
User-added image

4. Check which Veeam Proxy IPs are assigned
esxcli network firewall ruleset allowedip list | grep -v "All"
User-added image
 

Usage of a predefined VMware ESXi extension (VIB) for Veeams Backup from Storage Snapshot with Cisco HyperFlex IOvisor processing

$
0
0

Challenge

This article describes the usage of a predefined VMware ESXi extension (VIB) for Veeams Backup from Storage Snapshot with Cisco HyperFlex IOvisor processing.

Cause

To achieve optimal balancing within the Cisco HyperFlex data network at Backup from Storage Snapshot processing, it is needed to change the ESXi host firewall.
See more background information here.
One of the Methods to change the ESXi host firewall is by a pre-defined VIB that can be found at the Veeam Community GitHUB site.
To implement this, follow the below instructions.
 

Solution

Install the Firewall VIB on ESXi:

Repeat the following steps on all Cisco HyperFlex nodes in your cluster.

1. Enable ssh and log in to your ESXi host by using a tool like PuTTY
User-added image

2. Copy the VIB file to the ESXi host's tmp folder using HTTP or a SCP client
User-added image

3. Install the VIB
Command:
esxcli software vib install -v /tmp/VeeamCiscoHXFirewall.vib -f
User-added image

4. Verify the VIB was installed
Command:
esxcli software vib list | grep 'Veeam'
User-added image

5. Verify the new firewall rule is active
Command:
esxcli network firewall ruleset list
Note: If the VIB installation fails, you might need to set the acceptance level to CommunitySupport and retry the installation.
Command:
esxcli software acceptance set --level=CommunitySupported
User-added image


Set the Veeam Proxy Servers

1. Enable allowed IP list for the new firewall rule
Command:
esxcli network firewall ruleset set -r "VeeamCiscoHXFirewall" -a false 
User-added image

2. Set the Veeam proxy server data network IP (storage network)
Repeat the following command for all Veeam proxy server or set a subnet.
Command:
esxcli network firewall ruleset allowedip add -r "VeeamCiscoHXFirewall" -i "172.17.53.53."
User-added image

3. Verify the IPs are set
Command:
esxcli network firewall ruleset allowedip list | grep -v "All"
User-added image

Note: Veeam recommends to set the all IPs of Veeam proxy servers in the firewall rule. Otherwise the firewall rule is enabled for all incoming connections. You can specify either the IP address or a subnet. Use one command per proxy.


Check if everything is configured correctly

1. Check the Security Profile on the ESXi hosts
User-added image

2. Check the VIB
Command:
esxcli software vib list | grep 'Veeam'
User-added image

3. Check the ruleset
Command:
esxcli network firewall ruleset list
User-added image

4. Check which Veeam Proxy IPs are assigned
Command:
esxcli network firewall ruleset allowedip list | grep -v "All"
User-added image


Manual Firewall changes for Veeam Backup from Storage Snapshot with Cisco HyperFlex IOvisor processing

$
0
0

Challenge

This article describes making manual firewall changes for Veeam Backup from Storage Snapshot with Cisco HyperFlex IOvisor processing

Solution

To achieve the optimal balancing within the Cisco HyperFlex data network at Backup from Storage Snapshot processing, it is needed to change the ESXi host firewall. See more background information here.

One of the methods to change the ESXi host firewall is by manual creation of an ESXi host firewall rule. This configuration is reset by an ESXi host reboot and can be used for test environments.
To open ports on ESX(i) hosts, add the following firewall rule to the services.xml file on an ESX(i) host. 
<!--Cisco Firewall configuration information -->
 <ConfigRoot>
   <service id='9230'>
     <id>VeeamTestCiscoFirewall </id>
     <rule id='0000'>
       <direction>inbound</direction>
       <protocol>tcp</protocol>
       <porttype>dst</porttype>
       <port>
         <begin>0</begin>
         <end>65535</end>
       </port>
     </rule>           
  </service> 
</ConfigRoot>

The following example shows all steps required to open the firewall at an ESXi host SSH connection:
1. Back up the current services.xml file by running the command:
cp /etc/vmware/firewall/service.xml /etc/vmware/firewall/service.xml.bak

2. Modify the access permissions of the service.xml file to allow writes by running the chmod command:
chmod 644 /etc/vmware/firewall/service.xml

chmod +t /etc/vmware/firewall/service.xml
3. Open the service.xml file in a text editor:
vi /etc/vmware/firewall/service.xml
4. Add the rule to the service.xml file (see example above)
5. Revert the access permissions of the service.xml file to the read-only default by running the command:
chmod 444 /etc/vmware/firewall/service.xml
6. Refresh the firewall rules for the changes to take effect by running the command:
esxcli network firewall refresh
7. Enable the new firewall rule:
esxcli network firewall ruleset set -r "VeeamCiscoFirewall" -e true -a false 
8. Bind the firewall rule to all Veeam proxy server data network IPs, repeat the command for all proxy server:
esxcli network firewall ruleset allowedip add -r "VeeamCiscoFirewall" -i "<yourVeeamProxyIP>"
9. Check the IP binding
esxcli network firewall ruleset allowedip list | grep -v "All"
10. Check if the firewall rule is enabled
esxcli network firewall ruleset list


More Information

For more information about custom firewall rule creation, click here.

Configuring Cisco HyperFlex Controller Firewall for Veeam standard backup processing with DirectNFS enhancements

$
0
0

Challenge

This article describes configuring Cisco HyperFlex Controller Firewall for Veeam standard backup processing with DirectNFS enhancements.

Solution

Important!

This configuration is automated with the Veeam HyperFlex integration (Backup from Storage Snapshot) and only needed if the Cisco HyperFlex System was NOT added to the Veeam Storage Infrasturcture and DirectNFS with standard VMware snapshot processing is used. Veeam recommends using the HyperFlex Integration with Backup from Storage Snapshot with HyperFelx Snapshots instead of DirectNFS.


VMware vSphere VMs hosted on Cisco HyperFlex access the storage with the help of special Cisco HyperFlex HX Data Platform controllers. The controllers are dedicated VMs deployed on the same VMware ESX host that hosts the VMs.
By default, the controllers are configured to receive traffic only from the ESX(i) host where they are located. To provide communication between Veeam Backup & Replication and the Cisco HyperFlex storage system, you need to manually enable the Direct NFS access mode between the backup proxy and controllers.
To enable the Direct NFS access on a data platform controller:

1. Log on to the controller with an account that has root privileges:
#ssh <user account>@<Controller IP Address>
2.    Enable the NFS traffic between the backup proxy and nfs share:
stcli security whitelist add --ips <Veeam NFS Data IP>
To verify backup proxy settings, use the following command:
stcli security whitelist list

Important!
Veeam Backup & Replication cannot back up VMs that have VMware vSphere or Cisco HyperFlex snapshots in the DirectNFS mode. This limitation does not apply to Backup from Storage Snapshot over NFS.


Veeam Backup & Replication console slow or unresponsive

$
0
0

Challenge

The Veeam Backup & Replication console is slow to respond when switching between different views. The issue is more noticeable when attempting to search through the history of jobs.

Cause

In rare cases the VeeamBackup SQL DB can have many thousands of previous task sessions which causes queries run by the console to be delayed.

Solution

There are two parts to resolving this, one resolves the issue in the short term by removing old sessions from the SQL DB, the other is to limit how many sessions are stored in the SQL DB.
 
──────────────────────────────────────────────────────────
Clearing old sessions from the SQL DB
──────────────────────────────────────────────────────────
Note: SQL Management Studio is required to perform this task. All jobs must be stopped. 
Note: This stored procedure removes sessions from the database, if the database contains many session entries this may take a very long time (hours). Please plan accordingly.
  1. Stop all Veeam services.
  2. Connect to the SQL instance hosting the VeeamBackup database.
  3. Create a backup of the VeeamBackup database. (http://www.veeam.com/kb1471)
  4. Expand the DB to Programmability > Stored Procedures > dbo.DropStoppedOldJobSessions
  5. Right click > Execute... > in the window that appears enter how many days you want to keep
  6. Press OK to executeit will report “Query executed successfully.” when it completes.
  7. Start all Veeam services.
User-added image

──────────────────────────────────────────────────────────
Changing Session history retention
──────────────────────────────────────────────────────────
You can specify session history settings for jobs performed on the Veeam backup server. 
  1. Select Options from the main menu.
  2. Click the History tab.
  3. In the Sessions section, specify the number of sessions to display in the Sessions list of the History view.
In the Session history retention section, specify the number of sessions to keep in the Veeam Backup & Replication database.

User-added image


Setting up Veeam configuration database in SQL AlwaysOn Availability Group

$
0
0

Challenge

Run Veeam Backup and Replication database or Veeam Enterprise Manager database in SQL AlwaysOn Availability Group

Solution

If you want to deploy the Veeam Backup & Replication database (default name VeeamBackup) in SQL AlwaysOn Availability Group, then after running Veeam Backup & Replication setup you should do the following:
  1. Manually add the VeeamBackup database to the corresponding SQL AlwaysOn Availability Group.
  2. On the Veeam backup server, in the registry at HKEY_LOCAL_MACHINE\Software\Veeam\Veeam Backup and Replication specify the AlwaysOn Availability Group listener as the SqlServerName value.

in a similar vein, you can deploy Veeam Enterprise Manager database (default name VeeamBackupReporting) in SQL AlwaysOn Availability Group:
  1. Manually add the VeeamBackupReporting database to the corresponding SQL AlwaysOn Availability Group.
  2. On the Enterprise Manager server, in the registry at HKEY_LOCAL_MACHINE\Software\Veeam\Veeam Backup Reporting specify the AlwaysOn Availability Group listener as the SqlServerName value.

More Information

Contact your database administrator, if necessary.
Viewing all 4470 articles
Browse latest View live


<script src="https://jsc.adskeeper.com/r/s/rssing.com.1596347.js" async> </script>